
SSH Tunnels on macOS: Local, Remote, and Dynamic Port Forwarding
Reach a private service, connect a server to your local app, or browse through a SOCKS proxy. Learn how SSH tunnels work and how to save and manage them in Termbit.
On this page
How an SSH tunnel works
SSH port forwarding carries TCP connections through an encrypted SSH connection. The destination can be a database, an internal web app or another TCP service.
There are two parts to keep track of: the listener, where a connection enters the tunnel, and the destination, the service it should reach. SSH links the two. Local, remote and dynamic forwarding describe where the listener lives and how the destination is chosen.
You still need an SSH account on the server, permission to forward connections, and any credentials required by the destination service. The examples below use the ssh command available in macOS Terminal. Replace user with your SSH username and the example hostnames with your own.
Choose the right tunnel
| Type | Listener | A useful example |
|---|---|---|
Local -L | Your Mac | Connect a database app to PostgreSQL on a server. |
Remote -R | The SSH server | Let a process on the server reach your local development app. |
Dynamic -D | Your Mac | Access internal web apps through your SSH server. |
Start with the application making the connection. Where is it running, and what address will it connect to? Those two questions usually tell you which tunnel you need.
In all three cases, your Mac starts the SSH connection. Local and Remote refer to where the listener runs. The commands use -N to keep SSH open without starting a remote shell. Leave that terminal running while you use the tunnel; press ⌃C to stop it.
Local forwarding: reach a database from your Mac
Let’s use a database as our first example. PostgreSQL runs on db.example.com, listening on 127.0.0.1:5432. Your Mac can sign in to the server over SSH, but the database only accepts connections from the server itself. Open a tunnel to reach it from a database app on your Mac:
ssh -N -L 127.0.0.1:5433:127.0.0.1:5432 user@db.example.comSign in when prompted. With -N, a quiet terminal is expected.
→ 127.0.0.1:5433
127.0.0.1:5432
In your database app, enter host 127.0.0.1 and port 5433, then your usual database name, username and password. SSH authentication and database authentication are separate.
Why is 127.0.0.1 written twice?
The first address belongs to the listener on your Mac. The second is the destination as seen from the SSH server: here it means PostgreSQL on that server. Port 5433 is your local entry point; 5432 is the database’s real port.
If the database is on another machine in the server’s network, use its address as the destination. For example, -L 127.0.0.1:5433:10.0.0.5:5432 asks the SSH server to connect to 10.0.0.5:5432. That machine must be reachable from the server.
Save this route in Termbit. In Port Forwarding, create a Local rule with the same host, listener and destination. Stop the command above before connecting the rule, so port 5433 is free. Next time, start the saved rule without entering the command again. The Local forwarding example shows the form fields.
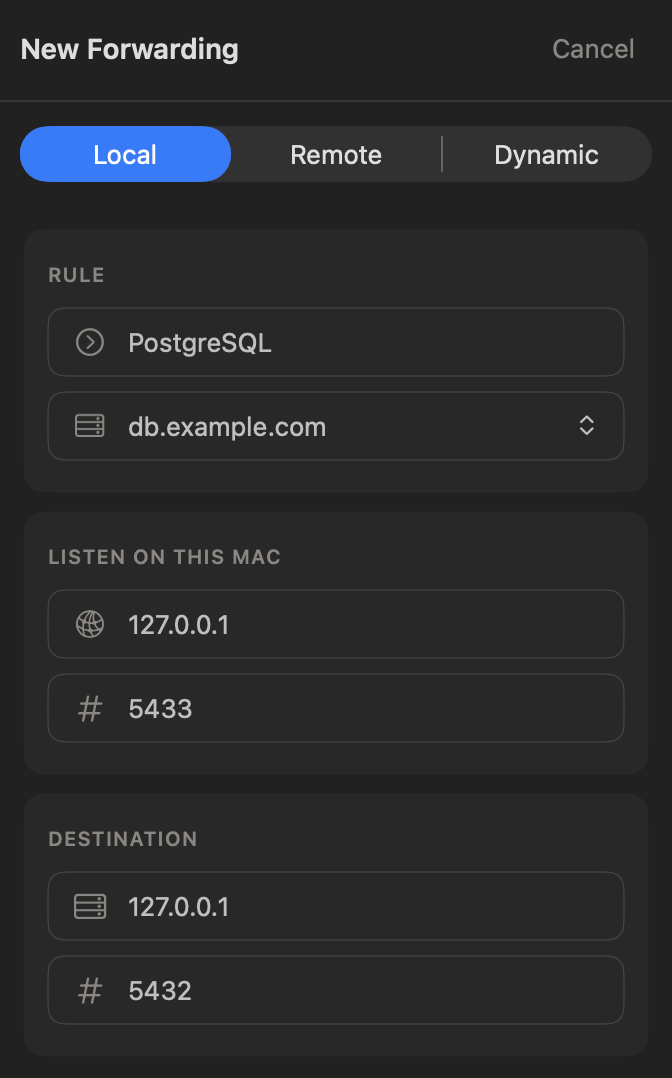
Remote forwarding: let a server reach your Mac
Now reverse the situation. Your development app runs on your Mac at 127.0.0.1:3000, and a process on web.example.com needs to call it. Create a listener on the server:
ssh -N -R 127.0.0.1:8080:127.0.0.1:3000 user@web.example.com→ 127.0.0.1:8080
127.0.0.1:3000
A process on the server can now call http://127.0.0.1:8080. To check it, open a second terminal, sign in to the server and run:
curl http://127.0.0.1:8080With -R, the destination is interpreted from your Mac. The final 127.0.0.1:3000 refers to your local app, while the first 127.0.0.1:8080 refers to the server’s listener.
This example is intended for a process on the server. With the default SSH server settings, other machines cannot reach its loopback listener. To receive webhooks from an external provider, configure a public entry point, such as an HTTPS reverse proxy with appropriate access controls.
Dynamic forwarding: a SOCKS proxy on your Mac
A local tunnel has a fixed destination. To access internal web apps, a SOCKS proxy lets your browser request different destinations through the same SSH connection.
ssh -N -D 127.0.0.1:1080 user@gateway.example.comSet your browser or another SOCKS-capable application to use a SOCKS5 proxy at 127.0.0.1:1080. The SSH server connects to the destinations requested by that application.
To try it from a second terminal on your Mac:
curl --proxy socks5h://127.0.0.1:1080 https://example.comIn curl, socks5h asks the proxy to resolve the destination hostname. This matters for names that only the server’s network can resolve. In a browser, check its SOCKS DNS setting as well.
Only traffic sent through the proxy uses the tunnel. Other applications keep their normal connections. OpenSSH’s dynamic forwarding handles TCP; it does not provide a full-device VPN or SOCKS UDP forwarding.
Who can reach the tunnel, and what is encrypted?
All commands here request a listener at 127.0.0.1. For Local and Dynamic, that limits access to your Mac. For Remote, the server’s GatewayPorts policy determines the final binding: GatewayPorts yes forces it to listen on all interfaces even when you request loopback.
Changing a listener to 0.0.0.0 can make it reachable through the machine’s network interfaces. Reachability then depends on the network, firewall and, for remote forwarding, SSH server policy. Consider who should be allowed to connect before broadening access.
SSH encrypts the link between your Mac and the SSH server. If either end connects onward to a service on another machine, that part of the route needs its own encryption, such as HTTPS or database TLS.
When the tunnel connects but the service does not
An SSH connection is only one part of the route. A working listener does not prove that the destination service is reachable. Check the route in order.
Address already in use
The listening port may already belong to another process. For a local listener, inspect it on your Mac:
lsof -nP -iTCP:5433 -sTCP:LISTENChoose another local port, such as 5434, and update the port in your database app too. For a remote listener, check the port on the server instead.
Connection refused
If your database app cannot connect to 127.0.0.1:5433, check that SSH is still running and the app uses the correct listening port. If SSH reports connect failed: Connection refused, check the destination service and port. Local and Dynamic destinations must be reachable from the SSH server; Remote destinations must be reachable from your Mac.
Administratively prohibited
The server may allow SSH sign-in while restricting tunnels. Ask its administrator to check AllowTcpForwarding, DisableForwarding, destination restrictions such as PermitOpen, listener restrictions such as PermitListen, and any restrictions on your SSH key.
Catch setup failures early
Add -o ExitOnForwardFailure=yes to make SSH exit if it cannot establish the requested listeners or forwarding requests. For example:
ssh -N -o ExitOnForwardFailure=yes \
  -L 127.0.0.1:5433:127.0.0.1:5432 user@db.example.com
This catches setup failures, such as an occupied listener port. It does not check whether PostgreSQL will accept a later connection. For more detail about an SSH failure, add -v and read the messages in the terminal.
Save and manage SSH tunnels in Termbit
When you regularly use the same database, internal web app or development app, save its route as a forwarding rule in Termbit. Open Port Forwarding and click New Forwarding to create one.
- Reuse a named rule. Keep the host, listener and destination together, ready to start again.
- Keep working without a terminal tab. Rules run independently of terminal sessions, so closing a tab does not stop the tunnel.
- Retry after a dropped connection. Enable Reconnect automatically for the rule.
- See the connection state. Check the rule’s status and click its error icon if a connection fails.
Rules stop when you quit Termbit; start the ones you need again after relaunch. The port forwarding documentation covers setup and controls for all three tunnel types.