SSH with a YubiKey on macOS: FIDO2 Security Keys in Practice
Use a YubiKey or another FIDO2 security key to sign in to SSH servers from your Mac. Understand what touch, PIN and resident keys change, then create and use a key in Termbit.
On this page
What changes with a hardware SSH key?
With an ordinary SSH key, your Mac holds a private key file and uses it to prove your identity to a server. A passphrase can protect that file, but someone who obtains the file and its passphrase can use a copy.
A FIDO2 SSH key depends on a physical device. Your Mac asks the security key to sign an authentication request, and the server checks the signature against your public key. The device’s secret cannot be exported as an ordinary private key file. Copying the files from your Mac is therefore not enough to sign in without the device.
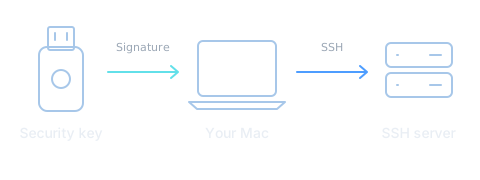
OpenSSH calls these key types ed25519-sk and ecdsa-sk. They are different from ordinary Ed25519 or ECDSA keys: you create a new credential on the device and add its public key to the server.
This protects the authentication credential, not an already open session. Keep your Mac secure and still verify the server’s host key; a security key does not replace that check.
Touch and PIN answer different questions
A security key can ask for a touch, a PIN, or both. These are separate settings, not two names for the same protection.
| Setting | What it checks |
|---|---|
| Require Touch | Someone is physically present and approves the operation. A touch alone does not establish who that person is. |
| Require PIN | The person using the device knows its FIDO2 PIN. This adds user verification to the signature. |
The device PIN is separate from your macOS password and the password for your server account. It is used locally with the security key; the SSH server does not receive it. Termbit does not save your device PIN.
Having a PIN set on the device does not, by itself, require a PIN for every SSH authentication. That is what Require PIN controls. For the example below, we enable both touch and PIN.
Where does a passphrase fit?
A key-file passphrase protects the local key file on your Mac. It does not replace the device PIN or physical approval. With FIDO2, the file contains a key handle: data the device needs to use your SSH key. The file alone cannot sign you in.
Resident and non-resident keys
A non-resident SSH key needs both the device and its local key file. If you lose every copy of that file, including any in your app data or backups, the device alone cannot recover the SSH key.
A resident key, also called a discoverable credential, keeps the information needed to recover the SSH key on the device. With the device and its PIN, you can add the same key on another Mac without the original local key file.
Both types depend on the hardware for signing. The choice is about how you recover the credential, not whether the secret can be copied off the device. A resident credential also uses storage on the security key, whose capacity is limited.
For this example, choose a resident key. It makes moving to another Mac straightforward. Keep touch and PIN enabled, and enroll a separate backup device if losing this one would lock you out.
Create your first FIDO2 SSH key
You need a USB FIDO2 security key, Termbit on your Mac, and an existing way to sign in to the server account you want to use. A YubiKey is one option; the available algorithms and settings depend on the connected device.
The server must support the selected security-key algorithm. OpenSSH added FIDO key support in version 8.2, and server-side PIN verification with verify-required in 8.4. Use a maintained server version with those features enabled.
On macOS, command-line setup can involve installing a separate OpenSSH build with FIDO support. Termbit handles the hardware directly, so you do not need to install another SSH client for this workflow.
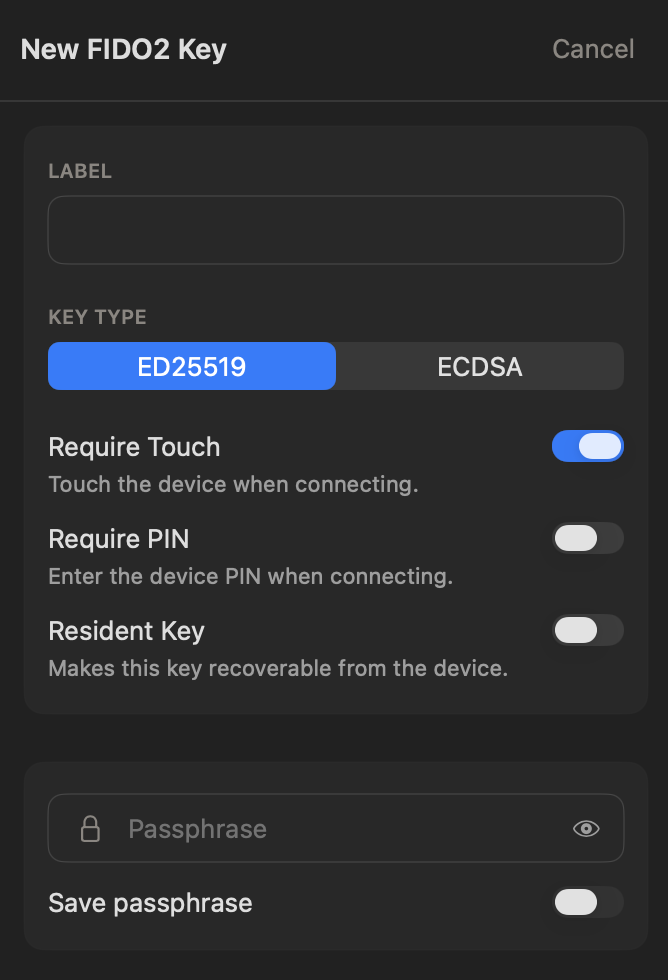
- Open Keys & Identities, click + New and choose FIDO2 → Generate Key.
- Insert and select your device. If it already has a FIDO2 PIN, enter it when prompted.
- Enter a label such as Work SSH. Select Ed25519 if the device supports it, or ECDSA for ECDSA P-256.
- Turn on Require Touch, Require PIN and Resident Key for this example. If an option is unavailable, check the device’s capabilities before continuing.
- Optionally add a passphrase to protect the local key file.
- Click Generate. If the device needs an initial PIN, follow the setup prompt. Touch the device when prompted, then click Save.
You now have an SSH key in your library, but the server does not trust it yet. The next step is to install its public key for your account.
Add the public key and connect
Suppose you already sign in as user on server.example.com. Keep that working session open while you add and test the new key.
Authorize the key on the server
In Keys & Identities, right-click Work SSH and choose Copy Public Key. On the server, add the complete copied line to a new line in ~/.ssh/authorized_keys for the user account. Preserve the existing entries.
Because we enabled Require PIN, Termbit includes verify-required before the public key. Keep that option when pasting: it tells OpenSSH to require proof of user verification. The public-key type itself starts with sk-ssh-ed25519@openssh.com or sk-ecdsa-sha2-nistp256@openssh.com.
If you manage the file yourself, ensure that the account owns it and that its permissions are appropriate. After saving the public key, run these commands on the server as that account:
chmod 700 ~/.ssh
chmod 600 ~/.ssh/authorized_keys
Select the key
Edit the saved host for server.example.com. Set the username to user, choose Public Key as the sign-in method and select Work SSH. Save the host and open a new connection.
When prompted, enter the device PIN and touch the security key. You do not need to approve every command or file transfer; a new connection or a reconnect can require approval again.
Confirm that the new session works before closing the original one. You can reuse the saved key for other hosts, adding its public key to each server account that should accept it.
Use the same resident key on another Mac
Install Termbit on the other Mac and insert the same device. In Keys & Identities, click + New, choose FIDO2 → Add from Device, select the device and enter its PIN. Select the SSH key you want to add.
This recovers the existing credential and its public key, rather than generating a new one. If the same public key is already authorized on the server, you do not need to install it again. Save your host on the new Mac and assign the recovered key.
A passphrase set on the original local key file is not restored with the key.
For a non-resident key, use Import from File with the original OpenSSH key file instead. You still need the physical device when you connect.
Keep a way back in
A resident key helps when you replace your Mac. It does not help if the security key itself is lost, damaged or reset: a local key file cannot recreate the device’s secret.
For important accounts, create a separate SSH credential on a second security key and authorize its public key too. Test that device, then store it separately from the one you carry.
Also know how to reach the server through an independent recovery route, such as your hosting provider’s console or an administrator. For non-resident keys, preserve a backup of the local key file as well.
If a device is lost, use your remaining access to remove its public-key entry from each affected account. Deleting the key from Termbit only removes the local record; it does not revoke server access or erase the device.
If the connection does not work
The server rejects the key without asking for a touch
Check the username, the selected key and the public-key entry for that account. The server must accept the chosen sk-* algorithm and any options on the line. A rejected public key may never reach the device-signing step.
The app cannot find the key
Use the device that created this credential. For a non-resident key, you also need its local key file. If macOS asks whether to allow the USB accessory, approve it before retrying.
The PIN is rejected
Enter the device’s FIDO2 PIN, not your Mac password, server password or key-file passphrase. Devices limit incorrect attempts, so stop guessing if you are unsure of the PIN. A device reset can erase credentials; use your backup access before considering it.
A resident key is missing on another Mac
Check that it was created with Resident Key enabled and that you selected the correct device. Add from Device cannot recover a non-resident key.
The FIDO2 security-key documentation covers the app controls, and the SSH key documentation explains key assignment and public-key installation.